Scapy—ARP扫描
一、项目背景
在上一篇文章中,本菜鸡大概写了一下关于 Ping扫描 ,这篇来介绍一下关于 ARP扫描 。
ARP 作为一个介于二层与三层直接的协议,起到承上启下的作用,在数据包构建上也是一样, ARP 在 Ether 上面,在 IP 下面,不过,这里不用考虑 IP 。
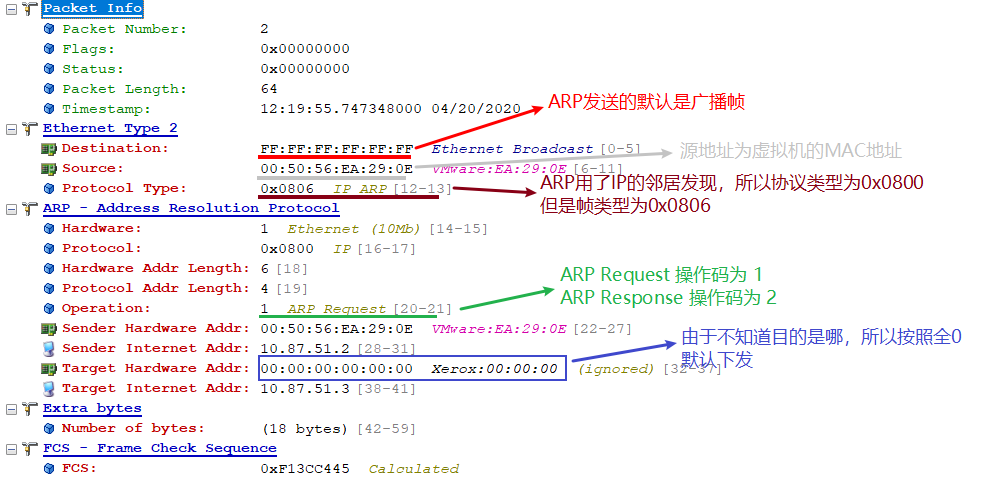
先来构建一个基本的 ARP 数据包,可以看到,源 IP 地址与源 MAC 它在构建的时候会自动填写,而 ARP 的工作方式又是发送广播帧,当目的地址不确定是,就可以像配置默认路由一样,全部置为:0 。于是,我们后面的代码中,只需要发送广播帧,将地址设置为全 0 即可达到扫描整个网段的目的。
>>> ARP()
<ARP  |>
>>> _.show()
###[ ARP ]###
  hwtype= 0x1
  ptype= IPv4
  hwlen= None
  plen= None
  op= who-has    #-->其实就是ARP-Request
  hwsrc= 00:0c:29:7f:7c:ee
  psrc= 10.87.51.3
  hwdst= 00:00:00:00:00:00
  pdst= 0.0.0.0
这里与 ARP 请求包做对比看一下
二、项目代码
1、单个包的代码分析
>>> p = Ether(dst='FF:FF:FF:FF:FF:FF')/ARP(op=1,pdst='10.87.51.1',hwdst='00:00:00:00:00:00')
>>> res = srp(p)
Begin emission:
Finished sending 1 packets.
*
Received 1 packets, got 1 answers, remaining 0 packets
>>> res
(<Results: TCP:0 UDP:0 ICMP:0 Other:1>, <Unanswered: TCP:0 UDP:0 ICMP:0 Other:0>)
#这里可以看到接收到的包是一个元组,里面包括已接收到的包的跟没有得到响应的包
#单独看一下收到的包,这是一个列表,而且只有一个元素,该元素还是元组
>>> type(res[0].res)
<class 'list'>
>>> res[0].res
[(<Ether  dst=FF:FF:FF:FF:FF:FF type=ARP |<ARP  op=who-has hwdst=00:00:00:00:00:00 pdst=10.87.51.1 |>>, <Ether  dst=00:0
c:29:7f:7c:ee src=00:50:56:c0:00:08 type=ARP |<ARP  hwtype=0x1 ptype=IPv4 hwlen=6 plen=4 op=is-at hwsrc=00:50:56:c0:00:0
8 psrc=10.87.51.1 hwdst=00:0c:29:7f:7c:ee pdst=10.87.51.3 |<Padding  load='\x00\x00\x00\x00\x00\x00\x00\x00\x00\x00\x00\
x00\x00\x00\x00\x00\x00\x00' |>>>)]
2、多个包的代码分析
#这里用两个变量,分别接收有回应的包跟没有回应的包
>>> ans, unans = srp(Ether(dst="ff:ff:ff:ff:ff:ff")/ARP(pdst="10.87.51.0/24"),timeout=2)
Begin emission:
**..........Finished sending 256 packets.
*..
#可以看到,接收到了3个有回应的包
>>> len(ans)
3
#这里拿出一个进行分析
>>> ans[0]
(<Ether  dst=ff:ff:ff:ff:ff:ff type=ARP |<ARP  pdst=10.87.51.1 |>>, <Ether  dst=00:0c:29:7f:7c:ee src=00:50:56:c0:00:08
type=ARP |<ARP  hwtype=0x1 ptype=IPv4 hwlen=6 plen=4 op=is-at hwsrc=00:50:56:c0:00:08 psrc=10.87.51.1 hwdst=00:0c:29:7f:
7c:ee pdst=10.87.51.3 |<Padding  load='\x00\x00\x00\x00\x00\x00\x00\x00\x00\x00\x00\x00\x00\x00\x00\x00\x00\x00' |>>>)

#这里的第一个部分表示向外发送的包
>>> ans[0][0]
<Ether  dst=ff:ff:ff:ff:ff:ff type=ARP |<ARP  pdst=10.87.51.1 |>>

#第二个部分,也就是【1】表示接收到的包
>>> ans[0][1]
<Ether  dst=00:0c:29:7f:7c:ee src=00:50:56:c0:00:08 type=ARP |<ARP  hwtype=0x1 ptype=IPv4 hwlen=6 plen=4 op=is-at hwsrc=
00:50:56:c0:00:08 psrc=10.87.51.1 hwdst=00:0c:29:7f:7c:ee pdst=10.87.51.3 |<Padding  load='\x00\x00\x00\x00\x00\x00\x00\
x00\x00\x00\x00\x00\x00\x00\x00\x00\x00\x00' |>>>
#这里想要获取到的是是回复方的源MAC地址,也就是我们00:00:00:00:00:00表示的一个目的MAC地址
>>> ans[0][1].getlayer(ARP).fields['hwsrc']
'00:50:56:c0:00:08'
3、代码编写
在编写代码的时候需要注意,由于 ARP 是二层协议,所以在导入模块的时候需要单独导入,另外负责收发包的 srp 模块也同样需要修改。
3.1、版本一:不指定接口
此版本在 Windows 系统中无法直接运行,但可在 Linux 系统下直接运行
#!/usr/bin/python3
# -*- coding: utf-8 -*-
# --author:valecalida--
# Edit time: 2020/4/17 20:34
from scapy.layers.inet import Ether
from scapy.layers.l2 import ARP
from scapy.sendrecv import srp
from threading import Thread
from ipaddress import ip_network
from time import time
import sys


def scan_single(host):
    packet = Ether(dst='FF:FF:FF:FF:FF:FF')/ARP(op=1, pdst=host, hwdst='00:00:00:00:00:00')
    response, _ = srp(packet, timeout=1, verbose=False)
    if response:
        print("IP: %s\t\tMac:%s" % (host, response[0][1].getlayer(ARP).fields['hwsrc']))


def scan_arp(network):
    ip_list = ip_network(network)
    for ip in ip_list:
        t = Thread(target=scan_single, args=[str(ip)])
        t.start()


if __name__ == '__main__':
    t1 = time()
    if len(sys.argv) == 2:
        host = sys.argv[1]
        scan_arp(host)
        t2 = time()
        print("[+] 本次扫描共花费 %s 秒" % (t2 - t1))
    else:
        print("Usage:\n\tpython3 Arp_Scan.py 192.168.1.0/24")
        sys.exit()
来看看代码运行如何,花费仅仅有1.4s,扫描了256(这里没去头去尾)台主机。
[root@localhost Desktop]# python3 Arp_Scan.py 10.87.51.0/24
IP: 10.87.51.1             Mac:00:50:56:c0:00:08
IP: 10.87.51.2             Mac:00:50:56:ea:29:0e
IP: 10.87.51.19            Mac:00:0c:29:90:28:a0
IP: 10.87.51.254           Mac:00:50:56:ee:e3:c7
[+] 本次扫描共花费 1.3971431255340576 秒
3.2、版本二:指定接口
可以在 Scapy 下查看当前系统下可用的接口
>>> ifaces
INDEX  IFACE                                                IP               MAC
18     VMware Virtual Ethernet Adapter for VMnet8  None             ff:ff:ff:ff:ff:ff
22     Npcap Loopback Adapter                      None             ff:ff:ff:ff:ff:ff
5      Microsoft Wi-Fi Direct Virtual Adapter      None             ff:ff:ff:ff:ff:ff
12     Realtek PCIe GBE Family Controller          None             ff:ff:ff:ff:ff:ff
3      VMware Virtual Ethernet Adapter for VMnet1  None             ff:ff:ff:ff:ff:ff
11     VirtualBox Host-Only Ethernet Adapter       None             ff:ff:ff:ff:ff:ff
-1     [Unknown] NdisWan Adapter                   None             ff:ff:ff:ff:ff:ff
-3     [Unknown] NdisWan Adapter                   None             ff:ff:ff:ff:ff:ff
-2     [Unknown] NdisWan Adapter                   None             ff:ff:ff:ff:ff:ff
上面这个被我手动改了改,不过大概的意思就是这样的,先看自己系统上的网络接口,然后再决定使用哪个。
#!/usr/bin/python3
# -*- coding: utf-8 -*-
# --author:valecalida--
# Edit time: 2020/4/17 20:34
from scapy.layers.inet import Ether
from scapy.layers.l2 import ARP
from scapy.sendrecv import srp
from threading import Thread
from ipaddress import ip_network
from time import time
import sys


def scan_single(iface, host):
    packet = Ether(dst='FF:FF:FF:FF:FF:FF')/ARP(op=1, pdst=host, hwdst='00:00:00:00:00:00')
    response, _ = srp(packet, iface=iface, timeout=1, verbose=False)
    if response:
        print("IP: %s\t\tMAC:%s" % (str.ljust(host, 15), response[0][1].getlayer(ARP).fields['hwsrc']))


def scan_arp(iface, network):
    ip_list = ip_network(network)
    for ip in ip_list:
        t = Thread(target=scan_single, args=[iface, str(ip)])
        t.start()


def usage():
    print("Usage:\n\tpython3 Arp_Scan.py -i <interfaces> network")
    print("\tpython3 Arp_Scan.py -i eth0 192.168.1.0/24")


if __name__ == '__main__':
    t1 = time()
    if sys.argv[1] == '-i' and len(sys.argv) == 4:
        print("[..] 开始进行ARP扫描")
        scan_arp(sys.argv[2], sys.argv[3])
        t2 = time()
        print("[+] 本次扫描共花费 %s 秒" % (t2 - t1))
    else:
        usage()
不过这样写起来话感觉就比较麻烦,每次要指定接口,还要指定 IP网段 ,就比较花时间…
Addiction:
大家可以看一下乾颐堂教主的课,搭配Scapy 2.4.3的官方文档,那就很棒了。